BLOGS

How to Drain Water from an Ac Window Unit

Draining water from an AC window unit is essential for homeowners who want to maintain a cool, dry, and mold-free indoor environment. At Air Master Inc., we know that while these units are convenient, improper drainage can lead to significant property damage and reduced cooling performance. Routine HVAC System Cleaning also plays a key role in preventing buildup that can block drainage paths and reduce overall efficiency. When your system generates condensation, that moisture needs a clear path to exit the chassis without dripping down your interior walls.


In this comprehensive guide, the experts at Air Master Inc. will walk you through the mechanics of a window air conditioner, explaining how to manage the condensation pan, keep the drain hole clear, and ensure your unit operates at peak efficiency. Scheduling a seasonal HVAC Tune Up can further improve performance and help identify minor drainage issues before they become costly repairs. By following these professional AC unit installation steps, you can protect your window frame, prevent AC water leakage, and improve your home's air quality with a reliable window AC drainage solution.


Pick the Perfect Window and AC Size for Maximum Cooling Power


Before you can worry about drainage, you must ensure the unit fits the space. Selecting a unit with the appropriate cooling capacity for your room size is the first step in moisture management. If a unit is too powerful for a small space, it will cycle off too quickly, leaving excess humidity in the air and water sitting in the pan. Consulting experienced Tulsa HVAC Experts can help you choose the right system and avoid common sizing mistakes.


Check the Energy Efficiency Ratio (EER) on the packaging to ensure you are getting a cost-effective model. A properly sized unit runs long enough to dehumidify the air effectively, and following a consistent HVAC Maintenance Schedule will keep the system operating smoothly throughout the cooling season.


Tools & Supplies You’ll Need Before You Get Started


Preparation is key to a proper window AC setup. Having your tools ready prevents mid-installation frustration and ensures the unit is secured safely.


  • Screwdriver set: For securing the side panels and sash locks.
  • Tape measure: To center the unit perfectly.
  • Level: Crucial for checking the rearward slope.
  • Weatherstripping: To create an airtight seal.
  • Drill: For pilot holes in the window frame.
  • Support bracket: Highly recommended for heavy units to ensure stability.

Step-by-Step Guide to Installing a Window AC Unit Safely


Follow these AC unit installation steps to ensure a secure fit:

  • Open the window and inspect the sill: ensure the wood or vinyl is strong enough to hold the weight.
  • Attach side panels: Slide the accordion panels onto the AC unit and secure them with the provided screws.
  • Lift and position: Carefully place the unit on the sill. It is often best to have a partner help with this step to install window AC safely.
  • Lower the sash: Bring the window sash down firmly behind the top metal rail of the AC unit.
  • Secure the unit: Use the provided brackets to screw the unit to the window sill and the sash to the frame.


Seal It Tight: Prevent Air Leaks and Boost Efficiency


To improve cooling efficiency, you must eliminate gaps where cool air escapes and hot, humid air enters. This is the best way to seal window AC units effectively.


Use high-density foam strips between the window glass and the AC frame. If the side panels feel flimsy, you can reinforce them with specialized insulating foam tape. This prevents the unit from working overtime, which in turn reduces the amount of condensation the system has to process. 


Drainage & Tilt Tips: Avoid Water Leaks and Mold Issues


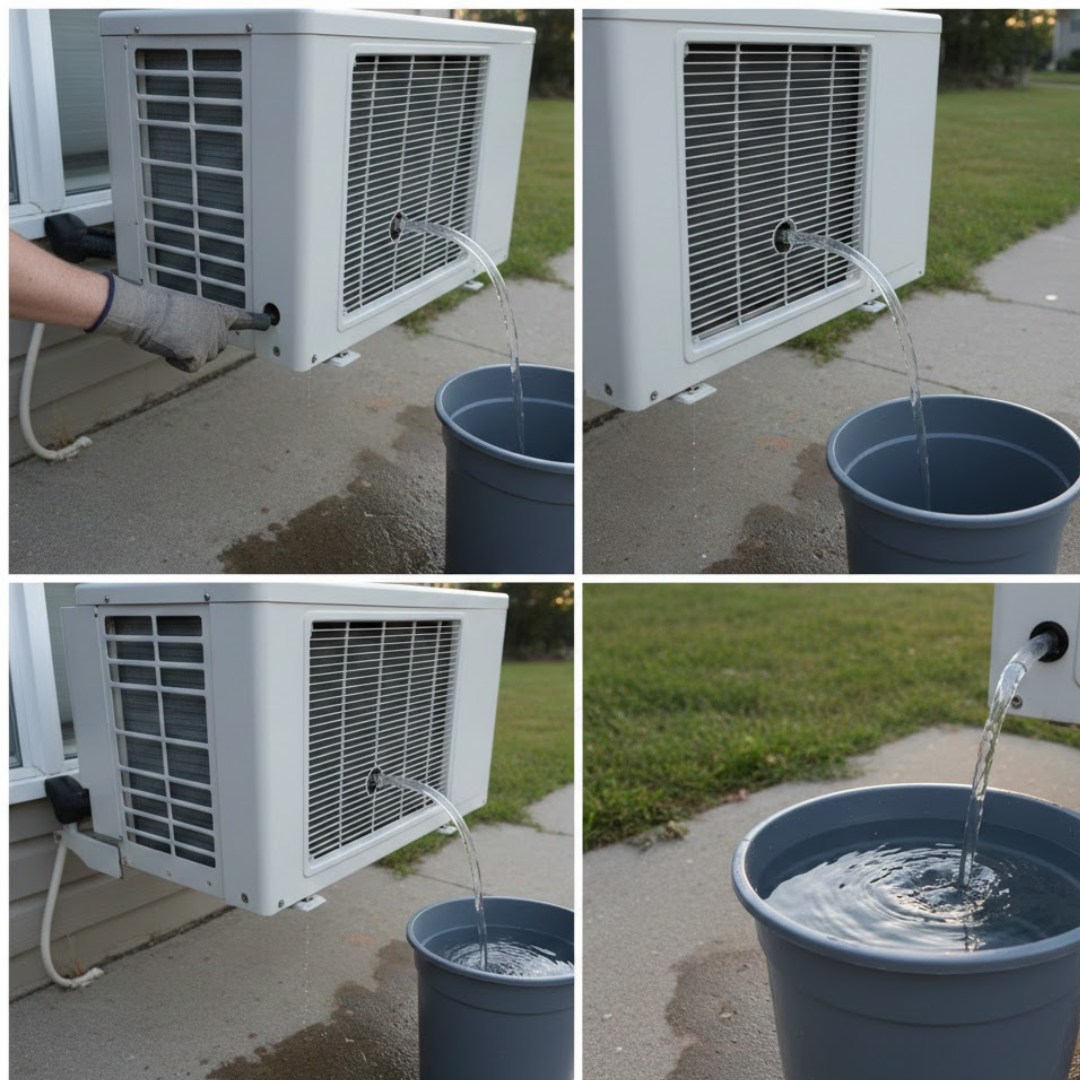
This is the most critical phase of learning how to drain water from AC window unit setups. Most modern units are designed to "sling" water against the condenser coils to help cool them down, but excess water must still exit through a designated drain hole.

  • The Critical Tilt: The back of the unit (the part outside) should be slightly lower than the front. This ensures gravity pulls water toward the rear condensation pan.
  • Clear the Drain Hole: Check the bottom-rear of the unit periodically. If dust or debris blocks the hole, water will back up and leak into your home.
  • The Window AC Drainage Solution: If you have a high-traffic walkway under the window, you can often attach a small plastic hose to the drain port to divert the water away from the path.

Final Safety Checks and First-Time Startup Tips


Before you hit the power button, perform a final walkthrough. Ensure the support bracket is taking the weight off the window sill and that the sash is locked so the window cannot be opened from the outside.


Plug the unit directly into a wall outlet—never an extension cord. Once running, listen for the fan. It should sound smooth. Check the outside of the unit after 30 minutes to ensure water is beginning to collect or drain as expected. 


FAQ


Do I need a support bracket for a window AC unit?

While some small units can sit on the sill, a support bracket is highly recommended for any unit over 6,000 BTUs. It transfers the weight to the side of the house, preventing damage to the window frame and ensuring the unit won't fall outward.


How much tilt should a window AC have?

A window AC should have a slight rearward tilt of about 1/4 to 1/2 inch. This is enough to ensure that moisture moves toward the back of the unit without being so steep that it puts a strain on the compressor.


Can I plug my window AC into an extension cord?

No, you should avoid this. Most extension cords are not rated for the high amperage an AC unit pulls, which can lead to overheating and fire hazards. Always plug the unit into a dedicated grounded wall outlet.


How do I seal gaps around my window AC?

The best way to seal window AC gaps is by using the foam insulation strips provided by the manufacturer. For extra protection, use "peel and seal" weatherstripping or clear removable caulk to stop air leaks around the accordion panels. 


How long does it take to install a window AC unit?

If you have all your tools ready, a standard installation usually takes between 30 and 45 minutes. Taking your time ensures you prevent AC water leakage later on. 


Conclusion


Managing moisture is just as important as managing temperature. By ensuring your unit has the proper tilt and a clear drainage path, you protect your home from water damage and mold. Remember that a clean drain hole and a level (but slightly tilted) condensation pan are the keys to a long-lasting cooling system.


If you are struggling with a difficult installation or notice persistent leaks, the team at Air Master Inc. is ready to help. We provide expert HVAC solutions across the US to ensure your home stays comfortable regardless of the weather outside. Contact Air Master Inc. today for professional assistance with your cooling needs and to learn more about how to drain water from AC window unit systems properly.

By Mike Tangella February 24, 2026
Master your window air conditioner installation with our expert guide. Learn how to measure, mount, and seal your AC unit for maximum summer cooling efficiency.
By Mike Tangella February 24, 2026
Learn about the AC capacitor, how it works, and signs of failure. Discover why this electrical component is vital for your HVAC condenser unit and compressor motor.
By Mike Tangella February 24, 2026
How Can I Schedule Routine HVAC Maintenance? Maintaining a comfortable home shouldn’t be a guessing game. For many homeowners, the heating and cooling system is "out of sight, out of mind" until it stops working on the hottest or coldest day of the year. That is where routine HVAC maintenance comes into play. In this guide, we will break down exactly how to schedule your service, what to expect during a visit, and why being proactive is the best way to protect your investment. By the end of this post, you'll know how to keep your home comfortable year-round without the stress of unexpected breakdowns or the need for Emergency AC Repair Service at the worst possible time. Regular upkeep is the secret to a long-lasting HVAC system. It ensures your air conditioning unit and furnace system operate at peak performance while keeping your monthly utility bills in check. Why Regular HVAC Tune-Ups Keep Your System Running Strong Think of your HVAC system like a vehicle. You wouldn't drive 50,000 miles without an oil change, and your home comfort system deserves the same level of care. A seasonal HVAC tune-up ensures that every mechanical component is lubricated, calibrated, and ready for heavy use. When you invest in energy-efficient heating and cooling , you aren't just paying for a technician to look at your unit. You are investing in: Extended Equipment Life: Small fixes now prevent total system failures later. Lower Utility Bills: Clean systems don’t have to work as hard to move air. Safety: Checking gas connections and electrical heat strips prevents fire hazards. Warranty Protection: Many manufacturers require proof of professional maintenance to honor equipment warranties. The Best Time of Year to Book Your HVAC Service Appointment Timing is everything. Most homeowners wait until their system breaks to call a licensed HVAC contractor , but the smartest move is to beat the seasonal rush. The ideal schedule for residential HVAC service follows a twice-a-year rule: Spring: Schedule maintenance for your AC or heat pump before the summer humidity hits. Fall: Schedule a furnace or heating inspection before the first frost of winter. Booking during these "shoulder seasons" ensures you get a convenient time slot and ensures your system is primed for HVAC system performance optimization before extreme temperatures put it to the test.
By Mike Tangella February 24, 2026
Looking for who installs HVAC systems in Tulsa? Air Master Inc., offers professional, energy-efficient heating and cooling solutions for homes and businesses.
By Mike Tangella February 24, 2026
How to find an emergency AC repair company fast with our expert guide on 24/7 services, costs, and troubleshooting tips for homeowners.
By Mike Tangella February 24, 2026
Planning a replacement? The real new HVAC system cost in 2026. Explore pricing for central air, heat pumps, and furnaces with Air Master Inc.’s expert guide.
By Mike Tangella February 24, 2026
When the summer heat kicks in, your air conditioning is more than just a luxury—it’s a necessity. However, many homeowners overlook the fact that their cooling system is a hardworking machine that requires regular upkeep. If you’ve noticed your energy bills creeping up or your home taking longer to cool down, it might be time for a thorough central AC cleaning . Learning how to clean HVAC unit components isn't just about aesthetics; it’s about protecting your investment. A clean system runs more smoothly, lasts longer, and provides much better air quality for your family. In this guide, we will walk you through the essential steps to maintain your system like a pro, ensuring you stay cool all season long. Why Cleaning Your HVAC Unit Is Important Maintaining a clean system is the backbone of effective AC maintenance . Over time, dust, pollen, and outdoor debris like grass clippings and leaves accumulate on your unit’s internal and external parts. This buildup acts as an insulating blanket, forcing the system to work twice as hard to move heat out of your home. When you prioritize cleaning, you improve your energy efficiency rating , which directly translates to lower monthly utility bills. Furthermore, regular cleaning prevents the premature need for an expensive AC repair . By keeping the air conditioner condenser coil and evaporator coil cleaning on your annual to-do list, you ensure that the mechanical components aren't under constant stress, extending the overall lifespan of your equipment. Tools and Materials Needed to Clean an HVAC Unit Before you dive in, gather the right tools. Having everything ready will make the process much smoother and prevent mid-project trips to the hardware store. Screwdriver or Nut Driver: To remove the access panels and protective grilles. Soft-Bristle Brush or Shop Vac: For removing loose debris and dust. Fin Comb: To straighten any bent aluminum fins on the coils. Commercial Coil Cleaner: A specialized spray for the evaporator coil cleaning process. Garden Hose: With a spray nozzle (avoid high-pressure settings). Replacement Air Filter: For your routine air filter replacement . Safety Gear: Gloves, eye protection, and a mask to avoid inhaling dust. Safety Precautions Before You Start Safety is the most critical step when learning how to clean HVAC unit setups. You are dealing with electrical components and moving parts, so never skip these steps: Shut Off the Power: Locate the exterior disconnect box near the outdoor unit and pull the plug or flip the switch to "off." Turn Off the Thermostat: Ensure the system won't try to kick on while you are working on it. Breaker Box: For extra safety, turn off the specific breaker for the HVAC system in your home’s main electrical panel. Wait for the Fan: Ensure the fan blades have completely stopped spinning before removing any protective casing.
By Mike Tangella February 24, 2026
HVAC system maintenance is essential for keeping your heating and cooling equipment running efficiently, safely, and reliably. Many homeowners know they need maintenance, but they are not always sure what it actually includes. Proper inspections also ensure your system matches your home’s needs by referencing tools like an HVAC Sizing Chart , which helps prevent energy waste and uneven temperatures. In this guide, we break down every key component of professional HVAC maintenance, explain why each step matters, and help you understand how regular service protects your investment. Whether you rely on your system for summer cooling or winter heating, routine care—such as making sure technicians clean HVAC unit components—improves airflow, efficiency, and indoor air quality. What Is HVAC Maintenance? At its core, HVAC maintenance is a scheduled series of inspections, cleanings, and calibrations designed to keep your heating, ventilation, and air conditioning units in peak condition. This also includes tasks like checking condensate lines and learning how to Drain Window AC systems properly to avoid leaks, moisture buildup, and unexpected system damage. Unlike an air conditioner repair visit, which happens after a failure occurs, maintenance is preventative. It involves a technician looking for signs of wear and tear, ensuring safety protocols are functioning, and optimizing the system for the lowest possible energy consumption. Whether it’s AC maintenance in the spring or furnace maintenance in the fall, the goal remains the same: reliability and efficiency. Why Regular HVAC Maintenance Matters Routine HVAC services provide long-term benefits that go beyond simple performance checks. Improved Energy Efficiency: When components are clean and properly adjusted, your system does not have to work as hard. This reduces energy consumption and lowers monthly utility bills. Longer Equipment Lifespan: Wear and tear increases when maintenance is skipped. Regular inspections and adjustments help extend the life of both your air conditioner and furnace. Fewer Emergency Repairs: Small issues discovered during maintenance can be corrected before they become expensive air conditioner repair calls. Better Indoor Comfort: Proper airflow and calibrated controls help maintain consistent temperatures throughout your home. For homeowners across the US, preventive HVAC maintenance is one of the most cost-effective ways to protect comfort and efficiency. Air Filter Inspection & Replacement: Air filter replacement is one of the most important parts of HVAC system maintenance.
By Mike Tangella February 24, 2026
How to clean HVAC system components effectively. Improve indoor air quality and efficiency with our DIY HVAC system cleaning tips and maintenance checklist.
By Mike Tangella February 24, 2026
How to determine the size of heating and air conditioning system units for your home. Discover why HVAC sizing matters and how to calculate the right tonnage.
More Posts